


It’s been a long time since I last blogged, and this may be the last time I blog here as I feel the title no longer adequately reflects my interests but… As I prepare my talk, on NoSQL generally and CouchDB in particular, for #DDD8 the applicability of Kuhn’s concept of the paradigm to the current NoSQL/RDBMS situation becomes more and more interesting for me. I’ll start by, in brief, stating
Monday, January 25, 2010
Friday, January 22, 2010
Do you want to host your external java script files in unlimited bandwidth? If you host your files on google code you can do for free. This helps your page load faster than any other free hosting service.
1. Log in to your google Google Code is hosting
You will see a screen like below:
2.Click Create New Project then you will see a screen like this:

3.After the contents of data in accordance with your wishes, for example as above, then click Create Project you'll see a screen like this:

4.Click Downloads then, click New Download

5.Then Browse for JavaScript (. Js) and attach the file. Now click "Submit file".

6.Then upload your Java script. after that you will see a screen like this:

7.If you want to get direct link from your java script file, click on the file name and select "Copy Link Address".

8.After that you can use, the sript like this:
9.Good luck and hopefully go to heaven accompanied by dreaming of a beautiful angel.
1. Log in to your google Google Code is hosting
You will see a screen like below:


5.Then Browse for JavaScript (. Js) and attach the file. Now click "Submit file".

6.Then upload your Java script. after that you will see a screen like this:

7.If you want to get direct link from your java script file, click on the file name and select "Copy Link Address".

8.After that you can use, the sript like this:
<script src='http://pbtemplates.googlecode.com/files/jquery.min.js' type='text/javascript'/>9.Good luck and hopefully go to heaven accompanied by dreaming of a beautiful angel.
Wednesday, January 20, 2010
Sembari jalan-jalan saya ngintip punya eh gak tahunya ada trik ya mungkin bisa dipakai untuk meningkatkan rank,kode ini unik, karena postingan anda lebih mudah terindex sama google.kayaknya udah terlalu panjang nih kita mulai saja yach,sekarang anda login lah ke account blogger anda... setelah login
menujulah ke halaman " layout " kemudian menuju lagi ke halaman " edit html ". Setelah anda berada di halaman " edit html " blog anda, sekarang carai code seperti di bawah ini :
Setelah itu code diatas ganti dengan code dibawah ini:
Setelah itu dapat simpan. Tapi friend ini hanyalah salah satu, yang pasti usahakan satu hari, satu postingan.Selamat mencoba dan semoga berhasil......
<title><data:blog.pageTitle/></title>
Setelah itu code diatas ganti dengan code dibawah ini:
<b:if cond='data:blog.pageType == "index"'>
<title><data:blog.pageTitle/></title>
<b:else/>
<title><data:blog.pageName/> ~ <data:blog.title/></title>
</b:if>
Setelah itu dapat simpan. Tapi friend ini hanyalah salah satu, yang pasti usahakan satu hari, satu postingan.Selamat mencoba dan semoga berhasil......
Sunday, January 17, 2010
Dalam auto read more versi I sudah saya tulis melalui blog ini. Mungkin teman-teman masih ingat oke kalau sudah lupa, akan saya ingatkan kembali Klik disini. Ok kita lanjutkan cara kerjanya masih tetap sama, ya.....begitu dech semua itu ada kelebihan dan kekurangannya. namanya juga bikinan manusia lain halnya dengan Tuhan YME pasti tidak ada kekurangannya.Weleh-weleh banyak ngocehnya, kita mulai aja yaa........josssssssssssss.
Seperti biasa login dulu Layout--->Edit HTML----> Expand widget templates, terus cari kode seperti ini :
1.Kemudian ganti kode diatas dengan kode dibawah ini :
2.Setelah itu letakkan kode dibawah ini sebelum </head> :
Untuk kode berwarna merah teman-teman bisa rubah sesuai dengan kebutuhan sedangkan warna biru teman-teman dapat download.Selamat mengerjakan dan lanjutkan.............
<data:post.body>1.Kemudian ganti kode diatas dengan kode dibawah ini :
<b:if cond='data:blog.pageType != "item"'>
<div expr:id='"summary" + data:post.id'><data:post.body/></div>
<script type='text/javascript'>createSummaryAndThumb("summary<data:post.id/>");</script>
<span class='rmlink' style='float:right'><a expr:href='data:post.url'>-->Read more...</a></span>
</b:if>
<b:if cond='data:blog.pageType == "item"'><data:post.body/></b:if>
2.Setelah itu letakkan kode dibawah ini sebelum </head> :
<script type='text/javascript'>
summary_noimg = 430;
summary_img = 340;
img_thumb_height = 100;
img_thumb_width = 120;
</script>
<script src='http://sites.google.com/site/sugwijays/read-more_auto.js' type='text/javascript'/>Untuk kode berwarna merah teman-teman bisa rubah sesuai dengan kebutuhan sedangkan warna biru teman-teman dapat download.Selamat mengerjakan dan lanjutkan.............
Saturday, January 16, 2010
Saya ada bocoran mengenai cara membuat efek marquee .. apa sih marquee itu dan yang gimana sih bentuknya...? pernah lihatkah anda tulisan yang bergerak atau berjalan kesamping kiri ke kanan atau sebaliknya dan atau bergerak dari atas kebawah atau sebaliknya..? nah.. itu namanya hasil pembentukan dari efek perintah marquee.Ok sebaiknya kita mulai ada dech copy kode dibawah ini pada blog anda dan anda dapat merubahnya menurut selera :
1.Model pertama dan contohnya:
2.Model kedua dan contohnya
contoh pertama polos tanpa tambahannya, dan contoh ini anda bisa rubah width: lebar , height: tinggi , bgcolor: warna dasar, behavior= mengatur gerakan, scrollamount= mengatur kecepatan, color= warna tulisannya.
Selamat anda mencoba semoga mendapat kepuasan. Salam.........
<marquee>Ubah kalimat ini dengan keinginan anda</marquee>
2.Model kedua dan contohnya
contoh pertama polos tanpa tambahannya, dan contoh ini anda bisa rubah width: lebar , height: tinggi , bgcolor: warna dasar, behavior= mengatur gerakan, scrollamount= mengatur kecepatan, color= warna tulisannya.
<marquee behavior='alternate' bgcolor='#FFD86B' scrollamount='8' width='400px'><span style='color:red'>Ubah kalimat ini dengan keinginan anda</span>
</marquee>
Selamat anda mencoba semoga mendapat kepuasan. Salam.........
Monday, January 11, 2010
Hai friend saya ada tips buat anda, kayaknya dibutuh bila pembaca/pengunjung karena kecilnya tulisan, maka tidak kelihatan alias tidak ke baca. Nah saya ada obatnya nich. sebaiknya hasilnya seperti ini. Ok bila tertarik kita mulai aja :
1.login pada blog anda, kemudian letakkan kode dibawah ini dibawah kode <head>:
2.Kemudian tambahkan gadget dan simpamkode script dibawah ini :
Simpan diliahat hasilnya,silahkan anda mencobanya dan semoga berhasil.
<script src='http://www.hotlinkfiles.com/files/2663270_r4kq8/textsizer.js' type='text/javascript'>
/***********************************************
* Visit http://www.sumbloggers.com/ for full source code
* fLW http://mutiaramail.blogspot.com
***********************************************/
</script>
2.Kemudian tambahkan gadget dan simpamkode script dibawah ini :
<a href="javascript:ts('body',1)">Zoom Font</a> | <a
href javascript:ts(="body" ,-1)>Normal</a
href>
Simpan diliahat hasilnya,silahkan anda mencobanya dan semoga berhasil.
Sunday, January 10, 2010
Terkadang kita bingung memilih navigasi, akan tetapi perlu diingat bahwa navigasi yang saya sampaikan ini suda umum akan tetapi bila postingan sudah terlalu banya maka navigasi ini mulai dibutuhkan.Adapun contohnya adalah :
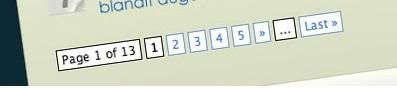
1-Login ke account blogger anda.
2-Click Layout--->
3-Click Edit HTML--->
4-Letakkan code dibawah ini sebelum ]]></b:skin>
5-Cari kode dibawah ini pada HTL anda
6-Letakkan kode dobawah ini sesudah kode </b:section>
7-Kemudian Simpan dan selesai. Selamat mencoba dan semoga berhasil.
1-Login ke account blogger anda.
2-Click Layout--->
3-Click Edit HTML--->
4-Letakkan code dibawah ini sebelum ]]></b:skin>
.showpageArea {padding: 0 2px;margin-bottom:10px;margin-top:10px;
}

.showpageArea a {border: 1px solid #505050;
color: #000000;font-weight:normal;
padding: 3px 6px !important;
padding: 1px 4px ;margin:0px 4px;
text-decoration: none;
}
.showpageArea a:hover {
font-size:11px;
border: 1px solid #333;
color: #000000;
background-color: #FFFFFF;
}

.showpageNum a {border: 1px solid #505050;
color: #000000;font-weight:normal;
padding: 3px 6px !important;
padding: 1px 4px ;margin:0px 4px;
text-decoration: none;

}
.showpageNum a:hover {
font-size:11px;
border: 1px solid #333;
color: #000000;
background-color: #FFFFFF;

}
.showpagePoint {font-size:11px;
padding: 2px 4px 2px 4px;
margin: 2px;
font-weight: bold;
border: 1px solid #333;
color: #fff;
background-color: #000000;

}

.showpage a:hover {font-size:11px;
border: 1px solid #333;
color: #000000;
background-color: #FFFFFF;

}
.showpageNum a:link,.showpage a:link {
font-size:11px;
padding: 2px 4px 2px 4px;
margin: 2px;
text-decoration: none;
border: 1px solid #0066cc;
color: #0066cc;
background-color: #FFFFFF;}

.showpageNum a:hover {font-size:11px;
border: 1px solid #333;
color: #000000;
background-color: #FFFFFF;
}
5-Cari kode dibawah ini pada HTL anda
<b:section class=main id=main showaddelement=yes>
<b:widget id=Blog1 locked=true title=Blog Posts type=Blog/>
</b:section>
6-Letakkan kode dobawah ini sesudah kode </b:section>
<script type='text/javascript'>
var home_page_url = location.href;
var pageCount=10;
var displayPageNum=6;
var upPageWord ='Previous';
var downPageWord ='Next';
function showpageCount(json) {
var thisUrl = home_page_url;
var htmlMap = new Array();
var thisNum = 1;
var postNum=1;
var itemCount = 0;
var fFlag = 0;
var eFlag = 0;
var html= '';
var upPageHtml ='';
var downPageHtml ='';
for(var i=0, post; post = json.feed.entry[i]; i++) {
var timestamp1 = post.published.$t.substring(0,19)+post.published.$t.substring(23,29);
timestamp = encodeURIComponent(timestamp1);
var title = post.title.$t;
if(title!=''){
if(itemCount==0 || (itemCount % pageCount ==(pageCount-1))){
if(thisUrl.indexOf(timestamp)!=-1 ){
thisNum = postNum;
}
if(title!='') postNum++;
htmlMap[htmlMap.length] = '/search?updated-max='+timestamp+'&max-results='+pageCount;
}
}
itemCount++;
}
for(var p =0;p< htmlMap.length;p++){
if(p>=(thisNum-displayPageNum-1) && p<(thisNum+displayPageNum)){
if(fFlag ==0 && p == thisNum-2){
if(thisNum==2){
upPageHtml = '<span class="showpage"><a href="/">'+ upPageWord +'</a></span>';
}else{
upPageHtml = '<span class="showpage"><a href="'+htmlMap[p]+'">'+ upPageWord +'</a></span>';
}
fFlag++;
}
if(p==(thisNum-1)){
html += '<span class="showpagePoint">'+thisNum+'</span>';
}else{
if(p==0){
html += '<span class="showpageNum"><a href="/">1</a></span>';
}else{
html += '<span class="showpageNum"><a href="'+htmlMap[p]+'">'+ (p+1) +'</a></span>';
}
}
if(eFlag ==0 && p == thisNum){
downPageHtml = '<span class="showpage"> <a href="'+htmlMap[p]+'">'+ downPageWord +'</a></span>';
eFlag++;
}
}
}
if(thisNum>1){
html = ''+upPageHtml+' '+html +' ';
}
html = '<div class="showpageArea"><span style="COLOR: #000;" class="showpageOf"> Pages ('+(postNum-1)+')</span>'+html;
if(thisNum<(postNum-1)){
html += downPageHtml;
}
if(postNum==1) postNum++;
html += '</div>';
var pageArea = document.getElementsByName("pageArea");
var blogPager = document.getElementById("blog-pager");
if(postNum <= 2){
html ='';
}
for(var p =0;p< pageArea.length;p++){
pageArea[p].innerHTML = html;
}
if(pageArea&&pageArea.length>0){
html ='';
}
if(blogPager){
blogPager.innerHTML = html;
}
}
function showpageCount2(json) {
var thisUrl = home_page_url;
var htmlMap = new Array();
var isLablePage = thisUrl.indexOf("/search/label/")!=-1;
var thisLable = isLablePage ? thisUrl.substr(thisUrl.indexOf("/search/label/")+14,thisUrl.length) : "";
thisLable = thisLable.indexOf("?")!=-1 ? thisLable.substr(0,thisLable.indexOf("?")) : thisLable;
var thisNum = 1;
var postNum=1;
var itemCount = 0;
var fFlag = 0;
var eFlag = 0;
var html= '';
var upPageHtml ='';
var downPageHtml ='';
var labelHtml = '<span class="showpageNum"><a href="/search/label/'+thisLable+'?&max-results='+pageCount+'">';
var thisUrl = home_page_url;
for(var i=0, post; post = json.feed.entry[i]; i++) {
var timestamp1 = post.published.$t.substring(0,19)+post.published.$t.substring(23,29);
timestamp = encodeURIComponent(timestamp1);
var title = post.title.$t;
if(title!=''){
if(itemCount==0 || (itemCount % pageCount ==(pageCount-1))){
if(thisUrl.indexOf(timestamp)!=-1 ){
thisNum = postNum;
}
if(title!='') postNum++;
htmlMap[htmlMap.length] = '/search/label/'+thisLable+'?updated-max='+timestamp+'&max-results='+pageCount;
}
}
itemCount++;
}
for(var p =0;p< htmlMap.length;p++){
if(p>=(thisNum-displayPageNum-1) && p<(thisNum+displayPageNum)){
if(fFlag ==0 && p == thisNum-2){
if(thisNum==2){
upPageHtml = labelHtml + upPageWord +'</a></span>';
}else{
upPageHtml = '<span class="showpage"><a href="'+htmlMap[p]+'">'+ upPageWord +'</a></span>';
}
fFlag++;
}
if(p==(thisNum-1)){
html += '<span class="showpagePoint">'+thisNum+'</span>';
}else{
if(p==0){
html = labelHtml+'1</a></span>';
}else{
html += '<span class="showpageNum"><a href="'+htmlMap[p]+'">'+ (p+1) +'</a></span>';
}
}
if(eFlag ==0 && p == thisNum){
downPageHtml = '<span class="showpage"> <a href="'+htmlMap[p]+'">'+ downPageWord +'</a></span>';
eFlag++;
}
}
}
if(thisNum>1){
if(!isLablePage){
html = ''+upPageHtml+' '+html +' ';
}else{
html = ''+upPageHtml+' '+html +' ';
}
}
html = '<div class="showpageArea"><span style="COLOR: #000;" class="showpageOf"> Pages ('+(postNum-1)+')</span>'+html;
if(thisNum<(postNum-1)){
html += downPageHtml;
}
if(postNum==1) postNum++;
html += '</div>';
var pageArea = document.getElementsByName("pageArea");
var blogPager = document.getElementById("blog-pager");
if(postNum <= 2){
html ='';
}
for(var p =0;p< pageArea.length;p++){
pageArea[p].innerHTML = html;
}
if(pageArea&&pageArea.length>0){
html ='';
}
if(blogPager){
blogPager.innerHTML = html;
}
}
</script>
<script type='text/javascript'>
var thisUrl = home_page_url;
if (thisUrl.indexOf("/search/label/")!=-1){
if (thisUrl.indexOf("?updated-max")!=-1){
var lblname1 = thisUrl.substring(thisUrl.indexOf("/search/label/")+14,thisUrl.indexOf("?updated-max"));
}else{
var lblname1 = thisUrl.substring(thisUrl.indexOf("/search/label/")+14,thisUrl.indexOf("?&max"));
}
}
var home_page = "/";
if (thisUrl.indexOf("?q=")==-1 && thisUrl.indexOf(".html")==-1){
if (thisUrl.indexOf("/search/label/")==-1){
document.write('<script src="'+home_page+'feeds/posts/summary?alt=json-in-script&callback=showpageCount&max-results=99999" ><\/script>')
}else{document.write('<script src="'+home_page+'feeds/posts/full/-/'+lblname1+'?alt=json-in-script&callback=showpageCount2&max-results=99999" ><\/script>')
}
}
</script>7-Kemudian Simpan dan selesai. Selamat mencoba dan semoga berhasil.
Saturday, January 9, 2010
At a certain period to send the search engine spider robots to check your blog's content, the robot spider will examine the latest messages content and send some data about your latest posting content to the database search engine, in this case, of course, only the data of the content that you post in accordance with the keyword meta tag that is placed on your blog.
Robot search engine spiders will find and send a lot of the same data coming from other blogs, remember there are million blogs on the internet. There are certain techniques to make your post content is not too much to compete with other blogs that make unique and new data in the database search engine.
Improve SEO (Search Engine Optimization) with a fresh and unique content posts are way more easy and useful to improve your blog PR (PageRank). More fresh and unique content of your blog posts will increase the PR (PageRank) more quickly, because it's easier for people to find your blog.
Fresh and deliver unique content has always played an important role in terms of SEO (Search Engine Optimization). Internet users surf the net daily to find the latest information about their interests. Search engines understand this and therefore place a heavy burden on the contents fresh. Blogs are updated on a regular basis also encourage the search engine robot spiders to visit often.
For example, a web page that has content that is updated every day will find that the search engines and crawling traffic on the page more often than other pages are less active. This clearly explains why the blog is often visited by the robot spiders compared to other web pages.
RSS feeds are probably the easiest way to get new content for your blog. This feed can be found by searching for RSS feeds on search engines. Syndicate and Feedster are some of the most popular directory of available feeds on the net. All you need is an RSS parser that can convert these feeds real-time content to your site and you will have a direct daily content!
RSS parser commonly used by many webmasters is the Magpie Parser; powerful open source PHP parser allows the coder to change the feed for each relevant content pages. RSS feeds are a great way to create fresh content when we do not have time to write.
Many other ways to have fresh content on the blog re your article. Directory of many available out there that allows webmasters to reprint their articles. To reprint articles that involve very little effort and often allow search engines to index new content for your blog.
In fact, many article directories to limit the number of times an article can be reprinted on your blog. However, this is one method that is easier to have fresh content.
All the methods mentioned above is great in creating fresh content, but also should be noted that creating unique content your site is another issue worth considering. The only way to create unique content is to write them yourself or ask someone else to write for you. This blog is very useful when it comes to adding new unique content.
Another method to obtain unique content is to create a dialogue group for your members. This is a very low operation if you have many supporters and active members willing to do.
In the eyes of SEO (Search Engine Optimization), content that is unique and new is very important. In order to display the latest information on your blog to visitors through search engines, update your blog regularly is a must so that the spider and the index will visit more often.
Thursday, January 7, 2010
The steps are as follows:
1. Log in to your GA account and you already have an account GA.
2. After a successful entry, which will have a configuration tab in your adsense account select GA.
3. Select AdSense for content and format you can customize to your liking.
4. Save the GA script into notepad.
5. Log in to your blog.
6. Select the layout tab, click Edit HTML and then check Expand Widget Templates box.
7. Then type CTRL + F or for use mozilla firefox, can go to see and then select find, after leaving the box to type search labeled ( data.post:body ).


 "
"
1. Log in to your GA account and you already have an account GA.
2. After a successful entry, which will have a configuration tab in your adsense account select GA.
3. Select AdSense for content and format you can customize to your liking.
4. Save the GA script into notepad.
5. Log in to your blog.
6. Select the layout tab, click Edit HTML and then check Expand Widget Templates box.
7. Then type CTRL + F or for use mozilla firefox, can go to see and then select find, after leaving the box to type search labeled ( data.post:body ).

8. And then copy the script below us GA

7. Remove sign <-- and --> before saving In his script GA.

8. Save and see the results.

8. Save and see the results.
Wednesday, January 6, 2010
Maybe my friend had known bloggers familiar with the "Recent Comments" .. now I want to review again how to make recent comment ...
2. Click 'Layout "& Click" Page Element'
3. Click 'Add a Gadget' where my friend would put Recent Comments on Blog buddies
4. Give title / Title Recent Comments and then copy and paste the code below ...
<script style="text/javascript" src="http://h1.ripway.com/dewie1701/showrecentcomments.js">
</script><script style="text/javascript">var numcomments = 15;var showcommentdate = true;var showposttitle = true;var numchars = 100;var standardstyling = true;</script> <script src="http://Nameofyourblog.blogspot.com/feeds/comments/default?alt=json-in-script&callback=showrecentcomments"></script>
6. Click the save and see the results.

Sweet dreams and meet with an angel
Monday, January 4, 2010
Over the years, we've all been taught that the best way to grow a sizeable mailing list is to give our visitors a great offer they can't say no to. And the most common way to attract more traffic and readers is to pay or trade with another marketer to have a popup window or hover ad on their site with your offer and hope that the visitors will be intrigued enough to sign up.
But more recently, we're learning that popup ads, hover ads and all those other gimmicks are simply driving visitors AWAY and leaving us with no sales and an unresponsive list.
Until now, there wasn't a sure-fire way to get your ad noticed without getting on people's nerves. One ad network is looking to change that - and do it all for free.
It's called SlideUpAds.
SlideUpAds is a unique, eye-catching way to advertise your site across an entire network without having to resort to distracting popups or banners.
With SlideUpAds, your ad appears at the bottom frame of the user's screen, so they can still scroll on the web page without being interrupted on whatever they're viewing. Since your ad slides up from the bottom gradually (and quickly), it's more likely to get noticed without being distracting and abruptly closed.
SlideUpAds costs nothing to join and there's no charge for any advertising. You simply fill out a short form and get the details of your account, then upload your ad and you're ready to go! It's simple and straightforward and most ads can be online within a few minutes.
For a limited time, SlideUpAds is also opening the doors to what they call "Viral Marketing Avalanche".
If you refer a friend and THEY join, you get 100% of that person's credits. If your friend refers a friend, you get 100% of THEIR credits too! Of course, your friends still get to keep their credits, but it's like getting double or even triple the exposure without doing any extra work!
Many people are reporting terrific success with SlideUpAds, particularly where popups and hover ads simply haven't performed well in the past. Consider testing your current opt-in form with SlideUpAds and gauge the response for yourself - you may be pleasantly surprised at the results!
To learn more, visit SlideUpAds - it's free to join and there's no membership fee.
Saturday, January 2, 2010
Trik Membuat Cloud Label ( Label Awan): "
* Login ke account blogger kamu.
* Pilih Tata Letak --> Edit HTML --> centang "Expand Template Widget".
* Cari kode berikut :
<b:section class='sidebar' id='sidebar' preferred='yes'>
atau kode-kode yang sejenis dalam template blog kamu.
Tips : Kalau susah mencarinya, coba tekan tombol F3 di keyboard. Maka akan muncul menu toolbar pencarian di bawah browser (Firefox), sehingga kamu tinggal memasukkan kata yang ingin dicari.
* Tambahkan kode berikut di bawahnya.
Catatan :

Selamat Mencoba....
 "
"
Label awan merupakan salah satu bentuk kumpulan daftar label yang ditampilkan seakan-akan berada di atas awan. Trik blogger ini juga sangat menarik untuk di adopsi dalam blog kamu. Kalau biasanya kamu hanya menggunakan label default bawaan widget atau gadget blogger.com, sekarang kamu memiliki salah satu variasinya.
Langsung di praktekin aja ya....
* Login ke account blogger kamu.
* Pilih Tata Letak --> Edit HTML --> centang "Expand Template Widget".
Tips : Sebelum melakukan edit template, sebaiknya simpan dulu template kamu yang ada dengan meng-klik tulisan Download Template Lengkap. Kemudian simpan dalam harddisk atau media penyimpanan lainnya, sehingga jika terjadi hal-hal yang tidak diinginkan kamu sudah memiliki back-up untuk mengembalikannya seperti semula.
* Cari kode berikut :
<b:section class='sidebar' id='sidebar' preferred='yes'>
atau kode-kode yang sejenis dalam template blog kamu.
Tips : Kalau susah mencarinya, coba tekan tombol F3 di keyboard. Maka akan muncul menu toolbar pencarian di bawah browser (Firefox), sehingga kamu tinggal memasukkan kata yang ingin dicari.
* Tambahkan kode berikut di bawahnya.
<b:widget id='Label99' locked='false' title='Labels' type='Label'>
<b:includable id='main'>
<b:if cond='data:title'>
<h2><data:title/></h2>
</b:if>
<div class='widget-content'>
<script src='http://halotemplates.s3.amazonaws.com/wp-cumulus-example/swfobject.js' type='text/javascript'/>
<div id='flashcontent'>Blogumulus by <a href='http://www.roytanck.com/'>Roy Tanck</a> and <a href='http://www.bloggerbuster.com'>Amanda Fazani</a></div>
<script type='text/javascript'>
var so = new SWFObject('http://halotemplates.s3.amazonaws.com/wp-cumulus-example/tagcloud.swf', 'tagcloud', '150', '200', '7', '#F8E0EC');
// uncomment next line to enable transparency
//so.addParam('wmode', 'transparent');
so.addVariable('tcolor', '0xB4045F');
so.addVariable('mode', 'tags');
so.addVariable('distr', 'true');
so.addVariable('tspeed', '100');
so.addVariable("tagcloud", "<tags><b:loop values='data:labels' var='label'><a expr:href='data:label.url' style='12'><data:label.name/></a></b:loop></tags>");
so.addParam('allowScriptAccess', 'always');
so.write('flashcontent');
</script>
<b:include name='quickedit'/>
</div>
</b:includable>
</b:widget>
Catatan :
- Ganti kode yang berwarna merah secara berturut-turut dengan lebar area label ('150'), tinggi area label ('200'), dan warna area label (#F8EOEC) sesuai dengan ukuran elemen halaman (lokasi peletakkan label awan) di blog kamu.
- Jangan sampai kelupaan jika kamu merubah warna area label. maka kamu mungkin perlu juga merubah warna teksnya yang ditunjukkan dengan warna hijau (B4045F). Khusus untuk perubahan warna teks, cara memasukkan kode tanpa embel-embel #.
- Atur putaran kecepatan dengan mengganti kode berwarna biru (100), makin besar makin cepat.
- Jangan lupa disimpan
Dalam kesempatan ini saya mencoba menulis trik bagaimana blog kita kelihatan cantik dan dapat menarik pengunjung pingin tahu caranya. Wah kayanya sudah gak sabar nich. Kita mulai saja. Begini ceritanya tapi sebelumnya lihat dan arahkan kursor pada gambarnya gimana tertarik? lanjut.........
1-Login ke account blogger anda.
2-Backup Template anda--->click-->Download Full Template
3-Click Layout--->
4-Click Edit HTML letakkan kode dibawah ini sebelum kode]]></b:skin>
2.Letakkan code dibawah ini sebelum </head> tag.
Lalu postingkan kode dibawah ini pada content anda tapi sebelumnya anda anda ganti kode yang berwarna biru....
Selamat mencoba dan semoga berhasil cheer.............
1-Login ke account blogger anda.
2-Backup Template anda--->click-->Download Full Template
3-Click Layout--->
4-Click Edit HTML letakkan kode dibawah ini sebelum kode]]></b:skin>
img.expando{ /*sample CSS for expando images. Not required but recommended*/
border: none;
vertical-align: top; /*top aligns image, so mouse has less of a change of moving out of image while image is expanding*/
}
2.Letakkan code dibawah ini sebelum </head> tag.
<script src="http://jqueryjs.googlecode.com/files/jquery-1.3.2.min.js" type="text/javascript"></script>
<script type="text/javascript" src="zenzoom.js">

/* Expando Image Script ©2008 John Davenport Scheuer
as first seen in http://www.dynamicdrive.com/forums/
username: jscheuer1 - This Notice Must Remain for Legal Use
*/</script>
Lalu postingkan kode dibawah ini pada content anda tapi sebelumnya anda anda ganti kode yang berwarna biru....
</code><div align="center"><img class="expando vacation" src="http://i721.photobucket.com/albums/ww218/sugwi/TheTree.jpg" border="0" height="66" width="100" /></div>Selamat mencoba dan semoga berhasil cheer.............
Friday, January 1, 2010
Para blogger yang merupakan bagian dari uang online usaha yang memiliki prestasi untuk menghasilkan uang secara online, yang perlu mereka ketahui tentang banyak hal untuk mencapai target nya. Sebagian besar blogger menggunakan pengetahuan dasar mereka untuk membuat uang secara online. Pengetahuan dasar bahwa adalah posting, posting dan posting ... ... ...
Seperti kita ketahui bahwa optimasi mesin pencari (SEO) adalah masalah yang sangat penting dalam meningkatkan blog atau situs kami popularitas dari sisi lalu lintas. Tapi aku benar-benar yakin bahwa sebagian besar blogger terutama pemula tidak ingin menyewa perusahaan SEO atau jasa spesialis untuk meningkatkan lalu lintas karena mereka (perusahaan SEO) memasang harga tinggi untuk layanan mereka atau blogger sendiri tidak punya cukup uang ... ..
Anda (blogger pemula) tidak perlu khawatir tentang bagaimana untuk meningkatkan keterampilan SEO Anda. Banyak blog atau situs akan memberikan keterampilan secara gratis hari ini. Satu-satunya hal yang perlu Anda lakukan adalah mencari mereka di mesin pencari terbesar seperti Google, Yahoo, dan lain-lain Anda hanya perlu untuk mempertahankan biaya internet dan waktu ....
Saya sedang belajar tentang SEO untuk Pagerank sekarang. Ketika kita berbicara tentang PageRank berarti kita berbicara tentang link yang merupakan pengukuran dasar untuk Pagerank. Link adalah membagi menjadi dua bagian, ada Backlink dan Crosslink. Kedua link ini telah mereka sendiri pengaruh penggunaan dan spesifik dalam meningkatkan Pagerank.
Crosslink ini sangat berguna untuk berbagi Pagerank Anda dari satu artikel ke yang lain dalam blog atau situs Anda dan memiliki trik sendiri untuk keperluan SEO. (Lihat 'Meningkatkan Pagerank dengan crosslink "untuk lebih detail). Crosslink juga sangat mudah untuk mempertahankan.
Backlink ini sangat berguna untuk menyerap blog atau situs lain Pagerank untuk blog atau situs Anda, dan memiliki bagian penting terbesar di sini. Banyak tips dan trik dapat digunakan untuk mendapatkan Backlink. (Lihat "Dapatkan Backlink dengan Memiliki Control" untuk salah satu dari mereka). Yah .... Bagian ini yang saya ingin memberitahu Anda ... ..
Backlink berarti banyak Pagerank tinggi (jika mungkin, cobalah untuk mendapatkan kualitas satu). Link dari blog atau situs yang memiliki kualitas yang baik yang disebut Pagerank Backlink, dan kualitas Backlink ini lebih berguna daripada jumlah itu sendiri.
Cara termudah adalah dengan meninggalkan komentar Anda di kolom komentar blog lain (tanpa nofollow tag). Namun, metode ini mengambil banyak waktu Anda dalam memeriksa tag nofollow di blog lain sebelum Anda meninggalkan komentar anda, jika tidak, usaha anda dengan trik ini tidak akan berguna karena banyak blog atau situs Anda menggunakan tag nofollow di isian komentar sekarang.
Salah satu trik teratas untuk meningkatkan Backlink adalah dengan menggunakan blog direktori atau blog agregator. Dalam metode ini, akan menjadi Crosslink Backlink untuk blog Anda. Mengapa tidak bisa seperti itu?
Sebagai contoh, Anda menulis artikel untuk blog Anda dan menempatkan link ke artikel lain di dalam blog Anda sendiri (link ini adalah crosslink untuk blog Anda). Blog agregator maka bot akan mengumpulkan artikel Anda dan memasukkan ke dalam blog agregator daftar artikel atau Anda dapat ping mereka. Ketika mesin pencari laba-laba merangkak bahwa blog agregator, crosslink Anda (sebelum) akan merah sebagai Backlink oleh laba-laba.
Biasanya, blog agregator hanya akan menampilkan ayat pertama dan kedua dalam daftar mereka (itu tergantung pada pengaturan), So .... Jangan lewatkan kesempatan ini. Tempatkan beberapa crosslink di dalam artikel pada ayat pertama dan kedua dengan kata jangkar bagus jika Anda ingin mendapatkan Backlink dan meningkatkan posisi mesin pencari Anda untuk beberapa kata kunci.
Ingat, jangan pernah mencoba untuk menempatkan lebih dari 3 link dalam satu paragraf. Hal ini sangat berbahaya dan berisiko bagi Pagerank Anda.
Hallo friend saya datang lagi memberi tips buat anda sekalian yaitu snow effect tanpa harus menyimpan kedalam hosting anda. so, kita mulai saja ya.....
Letakkan kode berikut sesuai dengan keinginan anda, tapi biasanya diletakkan ditas </head> lalu tunggu, dan lihan dengan cermat.
Selamat mencoba dan semoga sukses. I Love you Full. Ha..ha..ha...
Letakkan kode berikut sesuai dengan keinginan anda, tapi biasanya diletakkan ditas </head> lalu tunggu, dan lihan dengan cermat.
<script type="text/javascript" src="http://www.hotlinkfiles.com/files/2663209_gxiqt/snow_1.js">
/***********************************************
* Follow http://mutiaramail.blogspot.com
***********************************************/
</script>
Selamat mencoba dan semoga sukses. I Love you Full. Ha..ha..ha...
1.Add this whole code before the ]]></b:skin> tag:
/* ================================================================
Please don't remove this, you will find Mutiaramail for help easily
by this credit.
This menu is brought to you by Mutiaramail (http://Mutiaramail.blogspot.com)
Copyright (c) 2005-2007 Stu Nicholls. All rights reserved.
This stylesheet and the associated (x)html may be modified in any
way to fit your requirements.
=================================================================== */
#outer {width:750px; height:350px; background:url(filters.jpg) no-repeat right bottom; position:relative;}
.pad1 {width:51px; height:25px; background:#fc0; float:left; margin-top:3px; margin-right:3px; border:1px solid #000;}
.pad2 {width:52px; height:25px; background:#fc0; float:left; margin-top:3px; border:1px solid #000;}
.topline {width:748px; height:3px; border:1px solid #000; background:#fc0; font-size:1px;}
#menu {list-style-type:none; padding:0; margin:0 0 0 3px;}
#menu ul {list-style-type:none; padding:0; margin:0;}
#menu li {float:left; background:#cdc; margin:3px 3px 0 0; border:1px solid #000; width:123px; height:25px;}
#menu li.sub {background:#aba;}
/* for IE5.5 and IE6 only */
#menu li a {display:block; color:#000; height:25px; font-family:arial, sans-serif; font-size:11px; line-height:24px; width:123px; text-decoration:none; text-align:center;}
#menu li a table {position:absolute; left:0; top:-1px; border-collapse:collapse; width:0; height:0;}
#menu :hover {color:#fff; background:#898; position:relative;}
#menu :hover > a {color:#fff; background:#898;}
#menu ul,
#menu :hover ul ul,
#menu :hover ul :hover ul ul,
#menu :hover ul :hover ul ul.left {visibility:hidden; width:0; height:0; overflow:hidden;}
#menu :hover ul {visibility:visible; overflow:visible; position:absolute; height:auto; width:128px; left:-1px;top:26px; background:url(transparent.gif);} /* the background image is for IE7 */
#menu :hover ul :hover ul,
#menu :hover ul :hover ul :hover ul {visibility:visible; overflow:visible; height:auto; width:128px; padding:9px 3px; left:100px; top:0;}
#menu :hover ul :hover ul.left,
#menu :hover ul :hover ul :hover ul.left {visibility:visible; overflow:visible; height:auto; width:128px; padding:9px 3px; left:-106px; top:0;}
<script type="text/javascript">
function ieFix(topLevel)
{
var ua = navigator.userAgent;
var isMSIE = (navigator.appName == "Microsoft Internet Explorer");
var isMSIE5_5 = isMSIE && (ua.indexOf('MSIE 5.5') != -1);
var isMSIE6 = isMSIE && (ua.indexOf('MSIE 6.0') != -1);
if (isMSIE5_5 || isMSIE6)
{
document.getElementById(topLevel).innerHTML = document.getElementById(topLevel).innerHTML.replace (/<ul/gi,"<table><tr><td><ul").replace (/<\/ul>/gi,"</ul></td></tr></table></a>");
for (i=0;i<document.getElementsByTagName("li").length; i++)
{
if (document.getElementsByTagName("li").item(i).className == "sub")
{
document.getElementsByTagName("li").item(i).innerHTML = document.getElementsByTagName("li").item(i).innerHTML.replace(/<\/a>/i,"");
}
}
}
}
</script>
2.The first step is done, very easy right?Ok now Save and create a HTML/Javascript(Add A Gadget) and paste this code, at this step you can change the names,categories,labels by your own:
<div id="outer">
<div class="topline"></div>
<div class="pad1"></div>
<ul id="menu">
<li><a href="#nogo1">Home</a></li>
<li class="sub"><a href="#nogo2">Products</a>
<ul>
<li class="sub"><a href="#nogo3">Cameras</a>
<ul class="left">
<li><a href="#nogo4">Nikon</a></li>
<li><a href="#nogo5">Minolta</a></li>
<li><a href="#nogo6">Pentax</a></li>
</ul>
</li>
<li class="sub"><a href="#nogo7">Lenses </a>
<ul>
<li><a href="#nogo8">Wide Angle</a></li>
<li><a href="#nogo9">Standard</a></li>
<li><a href="#nogo10">Telephoto</a></li>
<li class="sub"><a href="#nogo11">Zoom</a>
<ul>
<li><a href="#nogo12">35mm to 125mm</a></li>
<li><a href="#nogo13">50mm to 250mm</a></li>
<li><a href="#nogo14">125mm to 500mm</a></li>
</ul>
</li>
<li><a href="#nogo">Mirror</a></li>
<li class="sub"><a href="#nogo15">Non-standard</a>
<ul class="left">
<li><a href="#nogo16">Bayonet mount</a></li>
<li><a href="#nogo17">Screw mount</a></li>
</ul>
</li>
</ul>
</li>
<li><a href="#nogo18">Flash Guns</a></li>
<li><a href="#nogo19">Tripods</a></li>
<li><a href="#nogo20">Filters</a></li>
</ul>
</li>
<li class="sub"><a href="#nogo21">Services</a>
<ul>
<li><a href="#nogo22">Printing</a></li>
<li><a href="#nogo23">Photo Framing</a></li>
<li><a href="#nogo24">Retouching</a></li>
<li><a href="#nogo25">Archiving</a></li>
</ul>
</li>
<li class="sub"><a href="#nogo26">Shop</a>
<ul>
<li><a href="#nogo27">Online</a></li>
<li><a href="#nogo28">Catalogue</a></li>
<li><a href="#nogo29">Mail Order</a></li>
</ul>
</li>
<li class="sub"><a href="#nogo30">Contacts</a>
<ul>
<li><a href="#nogo31">Support</a></li>
<li class="sub"><a href="#nogo32">Sales</a>
<ul class="left">
<li><a href="#nogo33">USA</a></li>
<li><a href="#nogo34">Canadian</a></li>
<li><a href="#nogo35">South American</a></li>
<li class="sub"><a href="#nogo36">European</a>
<ul class="left">
<li><a href="#nogo37">British</a></li>
<li><a href="#nogo38">French</a></li>
<li><a href="#nogo39">German</a></li>
<li><a href="#nogo40">Spanish</a></li>
<li><a href="#nogo41">Italian</a></li>
</ul>
</li>
<li><a href="#nogo42">Canadian</a></li>
<li><a href="#nogo43">Asian</a></li>
</ul>
</li>
<li><a href="#nogo44">Buying</a></li>
<li><a href="#nogo45">Photographers</a></li>
<li><a href="#nogo46">Stockist</a></li>
<li><a href="#nogo47">General</a></li>
</ul>
</li>
</ul>
<div class="pad2"></div>
</div>
Hai ..... Selamat berjumpa lagi, saya ada tips buat anda, untuk mempercantik Blog biar tambah keren, dengan harapan dapat menarik pengunjung. Oke .... kita mulai saja.
Letakkan kode dibawah ini, sesuai dengan keinginan sobat, sebelum di simpan di Blog, anda bisa mengganti kode berwarna biru sesuai kebutuhan.Tapi sebelumnya pharse kode dibawah ini.
Selamat mencoba dan semoga berhasil.
Letakkan kode dibawah ini, sesuai dengan keinginan sobat, sebelum di simpan di Blog, anda bisa mengganti kode berwarna biru sesuai kebutuhan.Tapi sebelumnya pharse kode dibawah ini.
<h2><script language="JavaScript1.2">
//Neon Lights Text II by G.P.F. (gpf@beta-cc.de)
//Fol http://mutiaramail.blogspot.id
//visit http://www.beta-cc.de
//Visit http://www.dynamicdrive.com for this script

var message="Ganti Text disini"
var neonbasecolor="gray"
var neontextcolor="yellow"
var neontextcolor2="#FFFFA8"
var flashspeed=100 // speed of flashing in milliseconds
var flashingletters=3 // number of letters flashing in neontextcolor
var flashingletters2=1 // number of letters flashing in neontextcolor2 (0 to disable)
var flashpause=0 // the pause between flash-cycles in milliseconds

///No need to edit below this line/////

var n=0
if (document.all||document.getElementById){
document.write('<font color="'+neonbasecolor+'">')
for (m=0;m<message.length;m++)
document.write('<span id="neonlight'+m+'">'+message.charAt(m)+'</span>')
document.write('</font>')
}
else
document.write(message)

function crossref(number){
var crossobj=document.all? eval("document.all.neonlight"+number) : document.getElementById("neonlight"+number)
return crossobj
}

function neon(){

//Change all letters to base color
if (n==0){
for (m=0;m<message.length;m++)
crossref(m).style.color=neonbasecolor
}

//cycle through and change individual letters to neon color
crossref(n).style.color=neontextcolor

if (n>flashingletters-1) crossref(n-flashingletters).style.color=neontextcolor2
if (n>(flashingletters+flashingletters2)-1) crossref(n-flashingletters-flashingletters2).style.color=neonbasecolor


if (n<message.length-1)
n++
else{
n=0
clearInterval(flashing)
setTimeout("beginneon()",flashpause)
return
}
}

function beginneon(){
if (document.all||document.getElementById)
flashing=setInterval("neon()",flashspeed)
}
beginneon()
</script></h2>
Selamat mencoba dan semoga berhasil.
Atomic Blogging 3.0 Honest Review: "If you have not started blogging, now is the time to get started. Already thousands of people around the world are now adapting to blogging as a platform to run their business online.
I got to know Alvin Phang from his famous Atomic Blogging 3.0 System. If you do not know Alvin, you should at least check out his famous blog at www.GatherSuccess.com where he earns his living online from just blogging online actively!
If you do read his blog, you will realize one thing that set Alvin away from the rest is that he practices what he preaches as he does make real good money just from blogging from his blog.
Alvin just recently launched a Atomic Blogging 3.0 system and I did look at the system myself and what I can say I am deeply impressed by the amount of details Alvin goes through in his guide.
Atomic Blogging 3.0 teaches you step-by-step how you can create a profitable blog in no time. There's even video tutorials provided to ensure you got everything to set yourself to create your blog fast!
Click Here To Check Out The System
Subscribe to:
Posts (Atom)


